


Travel photography is a wonderful way to capture the beauty of new places and the excitement of your adventures. Whether you’re a beginner with a smartphone or an experienced photographer with a DSLR, having a few essential tips can help you take stunning shots that truly reflect your experiences. In this article, we will explore some key strategies and techniques to enhance your travel photography, allowing you to preserve your memories in the most beautiful way. From understanding light to composing your shots, these tips will help you make the most of your camera and capture the essence of your travels.
Table of Contents
- Understanding Your Camera Settings for Travel Photography
- Choosing the Right Time and Lighting for Beautiful Shots
- Composing Stunning Images with Framing Techniques
- Editing Tips to Enhance Your Travel Photos
- Concluding Remarks
Understanding Your Camera Settings for Travel Photography
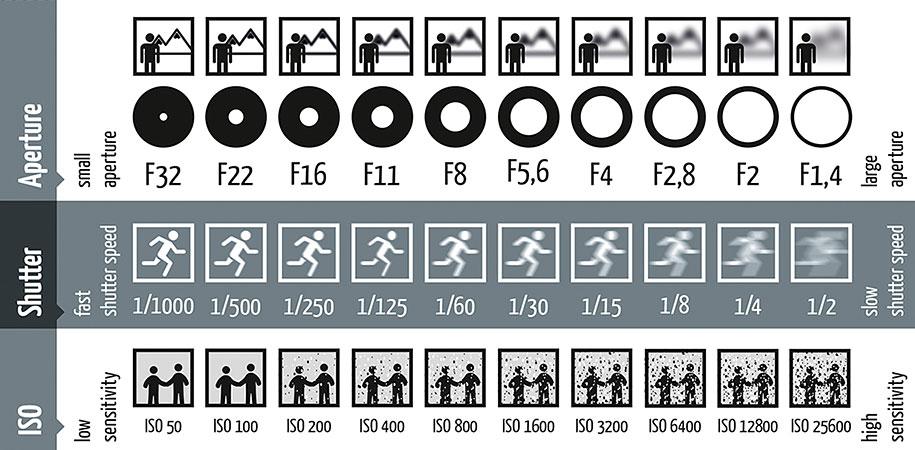
Understanding your camera settings is crucial for capturing breathtaking travel photographs. Familiarizing yourself with key settings such as ISO, aperture, and shutter speed will enable you to adapt to various lighting conditions and subjects you encounter on your journeys. Remember that a lower ISO setting (like 100 or 200) is ideal for bright conditions, whereas higher values (800 and above) are advantageous in low light. Your aperture, measured in f-stops, controls the depth of field; a lower f-number (e.g., f/2.8) offers a blurred background, perfect for portraits, while a higher value (e.g., f/11) keeps landscapes sharp.
Moreover, mastering the relationship between shutter speed and motion can make a significant difference in your shots. A fast shutter speed (1/500 seconds or faster) freezes action, ideal when photographing wildlife in motion, while a slower shutter speed (1/60 seconds and slower) can create beautiful motion blur in waterfall or street photography, adding a sense of dynamic energy to your images. Here are some tips for adjusting your settings on the go:
| Setting | Recommended Use |
|---|---|
| ISO | Bright conditions: 100-200 Low light: 800+ |
| Aperture | Portraits: f/2.8 Landscapes: f/8 to f/11 |
| Shutter Speed | Freeze motion: 1/500s+ Motion blur: 1/60s or slower |
Choosing the Right Time and Lighting for Beautiful Shots

Timing is everything in photography. For travel shoots, the golden hour—just after sunrise and before sunset—offers the most flattering natural light. This time frame bathes your subjects in soft, diffused sunlight, enhancing colors and textures while minimizing harsh shadows. To maximize this magical lighting, plan your shoots around these hours. Use the following tips to ensure you capture those breathtaking moments:
- Scout locations the day before to know when to arrive.
- Keep an eye on the weather forecast for clear skies.
- Experiment with different angles to play with light and shadow.
In contrast, midday sun can produce stark shadows and overexposed highlights, making your shots less engaging. If you find yourself shooting during this time, consider using shaded areas or finding reflective surfaces to soften the light. Additionally, employing artificial lighting tools like a reflector or external flash can help you manage difficult lighting conditions effectively. Here’s a brief comparison of lighting scenarios:
| Lighting Condition | Effect on Photography | Best Time for Use |
|---|---|---|
| Golden Hour | Soft, warm light | Sunrise & Sunset |
| Midday Sun | Harsh shadows, high contrast | Late Morning & Early Afternoon |
| Overcast | Even, diffused light | Anytime |
Composing Stunning Images with Framing Techniques
Utilizing effective framing techniques is essential for elevating the visual impact of your travel photos. By strategically incorporating elements from your surroundings, you can draw attention to your subject, creating a more compelling narrative. Here are some techniques to consider:
- Naturally occurring frames: Use archways, doorways, or branches to create a frame around your subject.
- Foreground interest: Adding something interesting in the foreground can give depth and lead the viewer’s eye to the background.
- Symmetry and lines: Look for leading lines and symmetrical patterns that can guide the viewer’s gaze to the focal point.
Experimenting with different framing options can profoundly change your composition. For example, rather than shooting from eye level, try capturing your subject from a lower angle, using grassy ground or rugged terrain to frame the shot. Consider using the Rule of Thirds as a guide; positioning your subject at the intersections of these lines can enhance balance and create more engaging images. A simple table can illustrate how different angles and frames affect your shots:
| Framing Technique | Effect on Composition |
|---|---|
| Naturally Occurring Frames | Focuses attention, adds context |
| Foreground Elements | Adds depth and layers |
| Leading Lines | Guides viewer’s eye, creates movement |
Editing Tips to Enhance Your Travel Photos
Enhancing your travel photos doesn’t always require extensive editing skills. Start by adjusting the brightness and contrast to make your images pop. Subtle changes can bring out the colors of a sunset or the intricate details of a market scene. You can also experiment with cropping to improve the composition, focusing on your subject and minimizing distractions in the frame. Utilizing features such as sharpening can aid in highlighting textures, particularly for landscapes or architecture.
Consider using filters to give your photos a unique touch, but use them sparingly to avoid an overly processed look. Whether you prefer the warmth of vintage styles or the cool tones of winter, filters can create a specific mood that reflects your travel experience. Additionally, employing tools for color correction can ensure that the hues in your images are true to life or convey a desired aesthetic. don’t forget to add some finishing touches, like a subtle vignette effect, to draw the viewer’s eye towards the center of your photo.
Concluding Remarks
capturing stunning travel photos is all about preparation and practice. By keeping these essential tips in mind, you can enhance your photography skills and make the most of every moment on your journey. Remember to be patient, experiment with different angles, and take the time to connect with your surroundings. With the right mindset and techniques, you’ll create lasting memories that you can share with others. Happy snapping!